You want to learn how to start a rebuilt engine for the first time. A rebuilt engine is an engine that has been taken apart, cleaned, and fixed with new parts. It is like a new engine, but it costs less and is better for the environment Starting a rebuilt engine is not hard, but you need to be careful and follow some steps. Here is an article that will explain everything you need to know in a simple way.
Do you have a rebuilt engine in your car or truck? Do you want to make sure it works well and lasts long? Then you need to know how to start it for the first time.
Starting a rebuilt engine for the first time is different from starting a normal engine. You need to do some things before and after you start it to make sure it runs smoothly and safely.

Here are the steps you need to follow to start a rebuilt engine for the first time:
Step 1: Pre-Oil the Engine
Before you start the engine, you need to make sure it has enough oil. Oil is a liquid that helps the engine parts move without rubbing against each other. If the engine does not have enough oil, it can get damaged or break down.
To pre-oil the engine, you need to use a special tool called a priming tool. A priming tool is a device that pumps oil into the engine without starting it. You can buy a priming tool online or at a car parts store.

To use the priming tool, you need to follow these steps:
- Remove the spark plugs from the engine. Spark plugs are small metal parts that make sparks to start the engine. You can use a wrench to unscrew them from the engine.
- Attach the priming tool to the oil pump. The oil pump is a part that moves oil around the engine. You can find it near the bottom of the engine. You may need to remove a cap or a bolt to access it.
- Connect the priming tool to a drill. A drill is a tool that spins fast and makes holes. You can use a cordless drill or a corded drill with an extension cord.
- Turn on the drill and let it run for a few minutes. This will make the priming tool pump oil into the engine. You will see oil coming out of the holes where the spark plugs were. This means the engine is getting oil.
- Turn off the drill and remove the priming tool. Put the cap or bolt back on the oil pump. Put the spark plugs back into the engine.
Now your engine is ready to start.
Step 2: Check the Fuel System
The fuel system is the part that brings fuel to the engine. Fuel is a liquid that burns and makes the engine work. The fuel system has different parts, such as the fuel tank, the fuel pump, the fuel filter, and the fuel injectors or carburetor.
You need to check the fuel system to make sure it is working properly and there are no leaks. Leaks are holes or cracks that let fuel escape. Leaks can cause fire or damage to the engine.
To check the fuel system, you need to follow these steps:
- Look at the fuel tank and the fuel lines. The fuel tank is a container that holds the fuel. The fuel lines are tubes that connect the fuel tank to the engine. Make sure they are not rusty, dented, or cracked.
- Turn on the ignition and listen for the fuel pump. The ignition is the part that turns on the engine. The fuel pump is a part that pushes fuel from the tank to the engine. You can find it near the tank or inside it. You should hear a humming or buzzing sound when the fuel pump is working.
- Check the fuel pressure. The fuel pressure is the amount of force that the fuel has when it reaches the engine. You need to have enough fuel pressure for the engine to run well. You can use a gauge to measure the fuel pressure. A gauge is a device that shows numbers or levels. You can buy a gauge online or at a car parts store.

To use the gauge, you need to follow these steps:
- Find the fuel rail. The fuel rail is a metal bar that connects the fuel lines to the fuel injectors or carburetor. The fuel injectors or carburetor are parts that spray fuel into the engine. You can find the fuel rail on top of the engine.
- Attach the gauge to the fuel rail. The gauge has a hose and a fitting that match the fuel rail. You may need to remove a cap or a valve to access the fuel rail.
- Turn on the ignition and read the gauge. The gauge will show the fuel pressure in pounds per square inch (psi). The fuel pressure should be within the range specified by the manufacturer. You can find this information in the owner’s manual or online.
- Turn off the ignition and remove the gauge. Put the cap or valve back on the fuel rail.
If the fuel pressure is too low or too high, you may have a problem with the fuel pump, the fuel filter, the fuel injectors, or the fuel regulator. You may need to replace or adjust these parts. If you are not sure how to do this, you should ask a professional mechanic or engine builder for help.
Step 3: Check the Ignition System
The ignition system is the part that makes sparks to start the engine. The ignition system has different parts, such as the spark plugs, the distributor, the ignition coil, and the ignition wires.
You need to check the ignition system to make sure it is working properly and there are no problems. Problems with the ignition system can cause the engine to run poorly or not start at all.

To check the ignition system, you need to follow these steps:
- Look at the spark plugs and the ignition wires. The spark plugs are small metal parts that make sparks to start the engine. The ignition wires are wires that connect the spark plugs to the distributor. Make sure they are not dirty, worn, or damaged.
- Check the spark plug gap. The spark plug gap is the space between the two metal parts of the spark plug. The spark plug gap should be the right size for the engine to work well. You can use a gauge to measure the spark plug gap. A gauge is a device that shows numbers or levels. You can buy a gauge online or at a car parts store.
To use the gauge, you need to follow these steps:
- Remove the spark plugs from the engine. You can use a wrench to unscrew them from the engine.
- Insert the gauge between the two metal parts of the spark plug. The gauge will show the spark plug gap in inches or millimeters. The spark plug gap should be within the range specified by the manufacturer. You can find this information in the owner’s manual or online.
- Adjust the spark plug gap if needed. You can use a tool to bend the metal part of the spark plug until the gap is the right size. You can buy a tool online or at a car parts store.
- Put the spark plugs back into the engine.
- Check the ignition timing. The ignition timing is the moment when the spark plugs make sparks to start the engine. The ignition timing should be synchronized with the movement of the pistons and valves in the engine. You can use a timing light to check the ignition timing. A timing light is a device that flashes a light when the spark plugs make sparks. You can buy a timing light online or at a car parts store.

To use the timing light, you need to follow these steps:
- Connect the timing light to the battery and the first spark plug. The timing light has three wires: a red wire, a black wire, and a clip wire. The red wire goes to the positive terminal of the battery. The black wire goes to the negative terminal of the battery. The clip wire goes to the first spark plug wire.
- Find the timing marks. The timing marks are marks on the engine that show the position of the crankshaft and the camshaft. The crankshaft and the camshaft are parts that move the pistons and valves in the engine. You can find the timing marks on the front of the engine, near the pulley or the flywheel. You may need to clean or paint the timing marks to see them better.
- Start the engine and point the timing light at the timing marks. The timing light will flash a light when the first spark plug makes a spark. You will see the timing marks move with the engine.
- Read the timing light and compare it to the specifications. The timing light will show the ignition timing in degrees before or after top dead center (TDC). TDC is the position when the piston is at the highest point in the cylinder. The ignition timing should be within the range specified by the manufacturer. You can find this information in the owner’s manual or online.
- Adjust the ignition timing if needed. You can use a wrench to loosen the distributor and turn it slightly until the timing light shows the correct ignition timing. The distributor is a part that distributes the sparks to the spark plugs. You can find it on top of the engine, near the spark plugs.
- Turn off the engine and disconnect the timing light.
If the ignition system is not working properly, you may have a problem with the spark plugs, the ignition wires, the distributor, the ignition coil, or the ignition module. You may need to replace or adjust these parts. If you are not sure how to do this, you should ask a professional mechanic or engine builder for help.
Step 4: Check the Cooling System
The cooling system is the part that keeps the engine from overheating. The cooling system has different parts, such as the radiator, the water pump, the thermostat, and the hoses.
You need to check the cooling system to make sure it is working properly and there are no leaks. Leaks can cause the engine to overheat or lose coolant. Overheating can damage the engine or cause it to stop working.

To check the cooling system, you need to follow these steps:
- Look at the radiator and the hoses. The radiator is a part that cools the coolant by passing it through metal fins. The hoses are tubes that connect the radiator to the engine and the water pump. Make sure they are not rusty, cracked, or loose.
- Fill the radiator with coolant. Coolant is a liquid that absorbs heat from the engine and transfers it to the radiator. You can buy coolant online or at a car parts store.
To fill the radiator with coolant, you need to follow these steps:
- Wait for the engine to cool down completely. Opening the radiator cap when the engine is hot can cause the coolant to boil and spray out, which can burn you or damage the engine.
- Open the radiator cap and check the coolant level. The radiator cap is a metal lid that covers the radiator. The coolant level should be near the top of the radiator. If it is low, you need to add more coolant.
- Pour the coolant into the radiator until it reaches the top. Use a funnel to avoid spilling the coolant. You may need to mix the coolant with water before pouring it, depending on the type of coolant you use. Follow the instructions on the coolant bottle.
- Close the radiator cap and start the engine. Let the engine run for a few minutes and check the temperature gauge. The temperature gauge is a device that shows how hot the engine is. It is usually located on the dashboard. The temperature gauge should stay in the normal range, which is usually between the cold and hot marks. If the temperature gauge goes above the normal range, you may have a problem with the cooling system.
Turn off the engine and check for leaks. Look under the car and see if there is any coolant dripping from the radiator, the hoses, or the water pump. The water pump is a part that moves the coolant around the engine. You can find it near the front of the engine, attached to a belt. If you see any leaks, you may need to replace or tighten the leaking part. If you are not sure how to do this, you should ask a professional mechanic or engine builder for help.
Step 5: Check the Battery
The battery is the part that provides electricity to the engine and other parts of the car. The battery has two terminals, a positive and a negative, that connect to the wires.
You need to check the battery to make sure it is fully charged and properly connected. A low or dead battery can prevent the engine from starting or cause it to stop working.

To check the battery, you need to follow these steps:
- Look at the battery and the wires. The battery is a rectangular box that is usually located under the hood, near the front of the car. The wires are cables that connect the battery to the engine and other parts of the car. Make sure the battery is not cracked, corroded, or leaking. Make sure the wires are not frayed, loose, or broken.
- Check the battery voltage. The battery voltage is the amount of electricity that the battery can provide. You need to have enough battery voltage for the engine to work well. You can use a voltmeter to measure the battery voltage. A voltmeter is a device that shows numbers or levels. You can buy a voltmeter online or at a car parts store
To use the voltmeter, you need to follow these steps:
- Turn off the engine and all the electrical devices in the car, such as the lights, the radio, and the air conditioner.
- Connect the voltmeter to the battery terminals. The voltmeter has two probes, a red and a black, that match the battery terminals. The red probe goes to the positive terminal, which has a plus sign (+). The black probe goes to the negative terminal, which has a minus sign (-).

- Read the voltmeter and compare it to the specifications. The voltmeter will show the battery voltage in volts (V). The battery voltage should be within the range specified by the manufacturer. You can find this information in the owner’s manual or online.
- Disconnect the voltmeter from the battery terminals.
If the battery voltage is too low, you may need to charge or replace the battery. If you are not sure how to do this, you should ask a professional mechanic or engine builder for help.
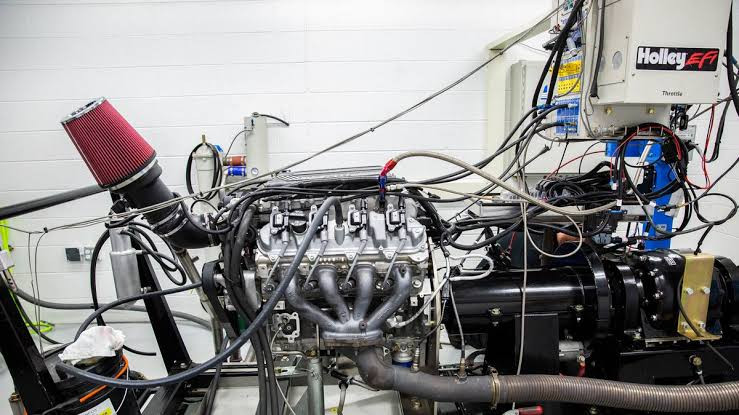
Step 6: Start the Engine
Now that you have checked and prepared all the systems, you are ready to start the engine for the first time. This is the most exciting and critical part of the process, so you need to be careful and attentive.

To start the engine, you need to follow these steps:
- Disable the ignition and fuel systems. The ignition system is the part that makes sparks to start the engine. The fuel system is the part that brings fuel to the engine. You need to disable these systems to crank the engine without it starting. This allows the oil pressure to build up before the engine fires.
To disable the ignition and fuel systems, you need to follow these steps:
- Remove the fuel pump fuse or relay. The fuel pump fuse or relay is a part that controls the power to the fuel pump. You can find it in the fuse box, which is usually located under the hood or under the dashboard. You may need to use a diagram or a manual to identify the right fuse or relay.

- Disconnect the ignition coil wire. The ignition coil wire is a wire that connects the ignition coil to the distributor. The ignition coil is a part that boosts the electricity for the spark plugs. The distributor is a part that distributes the sparks to the spark plugs. You can find the ignition coil wire on top of the engine, near the spark plugs. You may need to use a wrench or a screwdriver to disconnect the wire.
- Crank the engine for a few seconds. The engine is the part that converts fuel into motion. To crank the engine means to turn it over using the starter motor. The starter motor is a part that spins the engine when you turn the key.
To crank the engine, you need to follow these steps:
- Turn the key to the start position and hold it for a few seconds. The key is a metal piece that fits into the ignition switch. The ignition switch is a part that controls the power to the engine. You can find the key and the ignition switch on the steering column, which is the part that connects the steering wheel to the car.
- Release the key and let it return to the run position. The run position is the position where the key stays when the engine is running.
- Repeat this process a few times until the oil pressure gauge shows normal. The oil pressure gauge is a device that shows how much pressure the oil has in the engine. It is usually located on the dashboard. The oil pressure should be within the range specified by the manufacturer. You can find this information in the owner’s manual or online.
- Enable the ignition and fuel systems. To enable the ignition and fuel systems means to reverse the steps you did to disable them. This means you need to put back the fuel pump fuse or relay and reconnect the ignition coil wire.
Start the engine and monitor it closely. To start the engine means to make it run using the ignition and fuel systems. To monitor the engine means to watch and listen for any signs of abnormal operation, such as unusual noises or smoke.
To start and monitor the engine, you need to follow these steps:
- Turn the key to the start position and release it as soon as the engine starts. The engine should start smoothly and quickly. If the engine does not start or struggles to start, you may have a problem with the ignition or fuel systems. If the engine starts but makes loud or strange noises, you may have a problem with the mechanical parts. If the engine starts but produces smoke or smells bad, you may have a problem with the oil or coolant systems. If you notice any of these problems, you should turn off the engine and check the systems for faults. If you are not sure how to do this, you should ask a professional mechanic or engine builder for help.
- Keep the engine running at a high idle speed for at least 10 minutes. The idle speed is the speed at which the engine runs when you are not pressing the gas pedal. The high idle speed is the speed at which the engine runs faster than normal. You can adjust the idle speed by using the throttle or the idle screw. The throttle is a part that controls the amount of air and fuel that enter the engine. The idle screw is a part that adjusts the idle speed. You can find the throttle and the idle screw on the carburetor or the throttle body. The carburetor or the throttle body are parts that mix the air and fuel for the engine. You can find them on top of the engine, near the air filter. You may need to use a screwdriver or a wrench to adjust the idle screw. You should keep the engine running at a high idle speed to break in the new parts and reduce the friction. The high idle speed should be within the range specified by the manufacturer. You can find this information in the owner’s manual or online.
Check the temperature gauge and the oil pressure gauge. The temperature gauge and the oil pressure gauge are devices that show how hot the engine is and how much pressure the oil has in the engine. These gauges are important to monitor the engine’s health and performance.
Step 7: Break in the Engine
The engine break-in is the process of running the engine for a certain period of time to allow the new parts to wear in and settle properly. The engine break-in is important to ensure the longevity and performance of your rebuilt engine.
To break in the engine, you need to follow these steps:
- Change the oil and filter. The oil and filter are parts that lubricate and clean the engine. You need to change the oil and filter after the first 10 minutes of running the engine to remove any metal particles or debris that may have been generated during the initial start-up. You can use a conventional oil or a synthetic oil for the break-in, depending on your preference and the manufacturer’s recommendation. You can buy oil and filter online or at a car parts store.

- Drive the car for 500 miles. The car is the vehicle that contains the engine. You need to drive the car for 500 miles to complete the break-in period. You should vary the speed and load of the engine, avoiding constant speeds, high speeds, or heavy loads. You should also avoid using the cruise control, the overdrive, or the turbocharger, if your car has them. You should accelerate and decelerate smoothly and gradually, and avoid hard braking or rapid changes of gears. You should check the oil level and the coolant level regularly, and look for any signs of leaks or overheating.
- Change the oil and filter again. After driving the car for 500 miles, you need to change the oil and filter again to remove any remaining contaminants or impurities from the engine. You can use the same type of oil and filter as before, or switch to a different type, depending on your preference and the manufacturer’s recommendation.
Congratulations! You have successfully rebuilt and broken in your engine. You can now enjoy the benefits of your hard work and skill. You can also continue to maintain and improve your engine by following the regular service schedule and performing any necessary repairs or upgrades.
Comments (0)
Please login to join the discussion
Be the first to comment on this article!
Share your thoughts and start the discussion