In this article, we will discuss three DTC codes that are related to the intake valve control solenoid circuit (Bank 2): P0081, P0082, and P0083. We will explain what these codes mean, what are the symptoms of these codes, what are the possible causes of these codes, how to diagnose these codes, and how to fix these codes.
- P0081 Intake valve control solenoid circuit (Bank 2)
- P0082 Intake valve control solenoid circuit low (Bank 2)
- P0083 Intake valve control solenoid circuit high (Bank 2)
P0081 Intake valve control solenoid circuit (Bank 2)
What is the intake valve control solenoid?
The intake valve control solenoid is an electromechanical device that controls the opening and closing of the intake valves in the engine. The intake valves allow air and fuel to enter the combustion chamber during the intake stroke. The intake valve control solenoid receives signals from the engine control module (ECM) to adjust the timing and duration of the intake valve opening according to the engine speed, load, and temperature.

How does the intake valve control solenoid work?
The intake valve control solenoid consists of a coil of wire that creates a magnetic field when current flows through it. The magnetic field attracts or repels a metal plunger that is connected to a rod that moves the intake valve. The ECM controls the current flow to the solenoid by switching it on and off rapidly. This creates a pulse-width modulated (PWM) signal that varies the duty cycle of the current. The duty cycle determines how long the solenoid is on or off in each cycle. The longer the solenoid is on, the more the plunger moves and the more the intake valve opens.
What is the purpose of the intake valve control solenoid?
The purpose of the intake valve control solenoid is to optimize the engine performance, fuel efficiency, and emissions by varying the intake valve timing and lift. By changing the intake valve timing and lift, the engine can adjust the amount of air and fuel that enters the combustion chamber according to different operating conditions. This improves the engine power output, fuel economy, and reduces harmful emissions.

What are the symptoms of a bad intake valve control solenoid?
A bad intake valve control solenoid can cause various symptoms such as:
- Reduced engine power and acceleration
- Decreased fuel economy
- Rough idle or stalling
- Engine misfire or hesitation
- Check engine light on
How to test the intake valve control solenoid?
To test the intake valve control solenoid, you will need a digital multimeter, a scan tool, and a wiring diagram of your vehicle. Follow these steps:
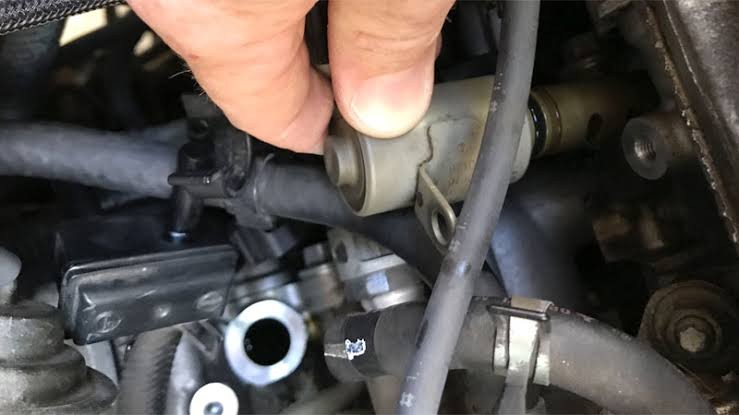
- Locate the intake valve control solenoid on your engine. It is usually mounted on the cylinder head near the intake manifold. You may need to remove some components to access it.
- Disconnect the electrical connector from the solenoid.
- Set your multimeter to measure resistance (ohms).
- Connect one probe of your multimeter to one terminal of the solenoid and connect another probe to another terminal of the solenoid.
- Check the resistance reading on your multimeter. It should be within the specifications given by your vehicle manufacturer. If not, replace the solenoid.
- Reconnect the electrical connector to the solenoid.
- Connect your scan tool to your vehicle’s diagnostic port.
- Turn on your ignition switch but do not start your engine.
- Use your scan tool to activate or command the intake valve control solenoid on and off.
- Listen for a clicking sound from the solenoid. If you hear a clicking sound, it means that the solenoid is working properly. If not, check for any wiring or connector problems between the ECM and the solenoid.
- Clear any DTC codes from your scan tool.

How to replace the intake valve control solenoid?
To replace the intake valve control solenoid, you will need a new solenoid, a socket wrench set, a screwdriver, and a torque wrench. Follow these steps:
- Disconnect your battery’s negative cable.
- Locate and remove any components that obstruct your access to the solenoid.
- Disconnect the electrical connector from the solenoid.
- Remove any bolts or screws that secure the solenoid to its bracket or housing.
- Pull out or twist off the old solenoid from its position.
- Install or push in or twist on the new solenoid to its position. Make sure it is aligned correctly and fits snugly.
- Reinstall any bolts or screws that secure the solenoid to its bracket or housing. Tighten them to the specified torque using your torque wrench.
- Reconnect the electrical connector to the solenoid.
- Reinstall any components that you removed earlier.
- Reconnect your battery’s negative cable.
- Start your engine and check for any leaks or noises from the solenoid area.
- Use your scan tool to clear any DTC codes and monitor the intake valve control solenoid operation.
P0082 Intake valve control solenoid circuit low (Bank 2)
What does it mean when the intake valve control solenoid circuit is low?
When the intake valve control solenoid circuit is low, it means that the ECM has detected a low voltage or current in the circuit that controls the intake valve control solenoid (Bank 2). This can indicate a short to ground, an open circuit, a faulty solenoid, or a faulty ECM.
What are the possible causes of a low intake valve control solenoid circuit?
Some of the possible causes of a low intake valve control solenoid circuit are:
- A short to ground in the wiring or connector of the intake valve control solenoid circuit
- An open or high resistance in the wiring or connector of the intake valve control solenoid circuit
- A faulty intake valve control solenoid
- A faulty ECM
How to diagnose a low intake valve control solenoid circuit?
To diagnose a low intake valve control solenoid circuit, you will need a digital multimeter, a scan tool, and a wiring diagram of your vehicle. Follow these steps:
- Connect your scan tool to your vehicle’s diagnostic port and retrieve any DTC codes and freeze frame data related to the intake valve control solenoid circuit.
- Locate the intake valve control solenoid on your engine and disconnect its electrical connector.
- Set your multimeter to measure voltage (volts).
- Connect one probe of your multimeter to the positive terminal of your battery and connect another probe to one of the terminals of the intake valve control solenoid connector. Check the voltage reading on your multimeter. It should be close to battery voltage. If not, there is a problem in the power supply circuit of the intake valve control solenoid. Check for any blown fuses, loose connections, or damaged wires in the power supply circuit.
- Connect one probe of your multimeter to the negative terminal of your battery and connect another probe to another terminal of the intake valve control solenoid connector. Check the voltage reading on your multimeter. It should be close to zero volts. If not, there is a problem in the ground circuit of the intake valve control solenoid. Check for any corrosion, loose connections, or damaged wires in the ground circuit.
- Reconnect the electrical connector to the intake valve control solenoid.
- Set your multimeter to measure resistance (ohms).
- Disconnect the electrical connector from the ECM that corresponds to the intake valve control solenoid circuit (Bank 2). Refer to your wiring diagram for the correct pin location.
- Connect one probe of your multimeter to one terminal of the ECM connector and connect another probe to one terminal of the intake valve control solenoid connector. Check the resistance reading on your multimeter. It should be within the specifications given by your vehicle manufacturer. If not, there is a problem in the wiring or connector between the ECM and the intake valve control solenoid. Check for any shorts, opens, or high resistance in the wiring or connector between the ECM and the intake valve control solenoid.
- Reconnect the electrical connector to the ECM.
- Use your scan tool to activate or command the intake valve control solenoid on and off.
- Measure the voltage or current at the intake valve control solenoid connector using your multimeter. It should change according to the PWM signal from the ECM. If not, there is a problem in the solenoid or the ECM. Replace the faulty component.
- Clear any DTC codes from your scan tool.

P0083 Intake valve control solenoid circuit high (Bank 2)
What does it mean when the intake valve control solenoid circuit is high?
When the intake valve control solenoid circuit is high, it means that the ECM has detected a high voltage or current in the circuit that controls the intake valve control solenoid (Bank 2). This can indicate a short to power, a faulty solenoid, or a faulty ECM.
What are the possible causes of a high intake valve control solenoid circuit?
Some of the possible causes of a high intake valve control solenoid circuit are:
- A short to power in the wiring or connector of the intake valve control solenoid circuit
- A faulty intake valve control solenoid
- A faulty ECM
How to diagnose a high intake valve control solenoid circuit?
To diagnose a high intake valve control solenoid circuit, you will need a digital multimeter, a scan tool, and a wiring diagram of your vehicle. Follow these steps:
- Connect your scan tool to your vehicle’s diagnostic port and retrieve any DTC codes and freeze frame data related to the intake valve control solenoid circuit.
- Locate the intake valve control solenoid on your engine and disconnect its electrical connector.
- Set your multimeter to measure voltage (volts).
- Connect one probe of your multimeter to one terminal of the intake valve control solenoid connector and connect another probe to a good ground point on your vehicle. Check the voltage reading on your multimeter. It should be close to zero volts. If not, there is a problem in the wiring or connector of the intake valve control solenoid circuit. Check for any shorts to power, loose connections, or damaged wires in the wiring or connector of the intake valve control solenoid circuit.
- Reconnect the electrical connector to the intake valve control solenoid.
- Set your multimeter to measure resistance (ohms).
- Disconnect the electrical connector from the ECM that corresponds to the intake valve control solenoid circuit (Bank 2). Refer to your wiring diagram for the correct pin location.
- Connect one probe of your multimeter to one terminal of the ECM connector and connect another probe to one terminal of the intake valve control solenoid connector. Check the resistance reading on your multimeter. It should be within the specifications given by your vehicle manufacturer. If not, there is a problem in the wiring or connector between the ECM and the intake valve control solenoid. Check for any shorts, opens, or high resistance in the wiring or connector between the ECM and the intake valve control solenoid.
- Reconnect the electrical connector to the ECM.
- Use your scan tool to activate or command the intake valve control solenoid on and off.
- Measure the voltage or current at the intake valve control solenoid connector using your multimeter. It should change according to the PWM signal from the ECM. If not, there is a problem in the solenoid or the ECM. Replace the faulty component.
- Clear any DTC codes from your scan tool.
Conclusion:
If you have any of these DTC codes (P0081, P0082, or P0083), you should not ignore them as they can affect your engine performance, fuel efficiency, and emissions. You should diagnose and fix them as soon as possible using the steps we have provided in this article. You may also need to consult a professional mechanic if you are not confident or experienced in doing these repairs yourself.
To prevent these DTC codes from happening, you should maintain your engine regularly and follow the recommended service intervals for your vehicle. You should also use good quality oil and fuel and replace any worn or damaged parts as needed.
Comments (0)
Please login to join the discussion
Be the first to comment on this article!
Share your thoughts and start the discussion